1. Installation of the ‘Front Row’ theme
After you purchased our WordPress theme ‘Front Row’ you’ll receive a zip file containing the theme file (ZIP), the framework file (ZIP), a beginner’s guide to getting started with Genesis (PDF) and any additional files for widgets etc.
First you have to unzip “frontrow-theme-package.zip”. Please do not unzip the inner theme files!
“genesis.zip” is the framework file which keeps your theme running. You can read more about how it works in the beginner’s guide to Genesis.
Within your WordPress Dashboard navigate to Appearance > Themes.
Click the “Add New” button at the top of the page. > Click the “Upload Theme” button.
Click “Choose File”, find “genesis.zip” and click the “Install Now” button.
You don’t have to activate this framework file, just click the button “Return to Themes Page”.
“frontrow.zip” is the main theme file.
Again click on the “Add New” button at the top of the page. > Click the “Upload Theme” button.
Click “Choose File”, find “frontrow.zip” and click the “Install Now” button.
Now you can click the “Activate” button.
Now you have successfully uploaded your theme.
2. Set up the main navigation
The menu consists of two sections: the navigation menu and social media icons.
Set up the Menu
Navigate to Appearance > Menus.
Click the “Create a New Menu” button > Choose a menu name.
Be sure to check the “Primary Navigation Menu” box at the bottom of the page.
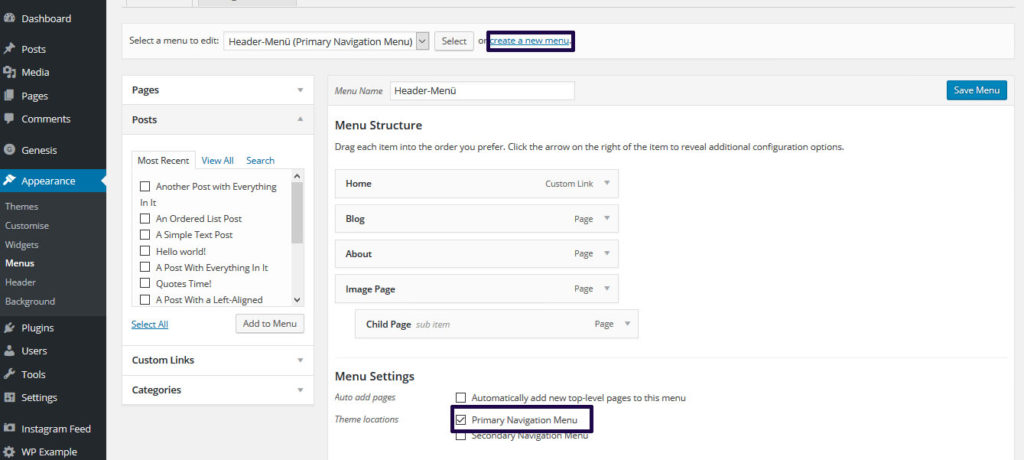
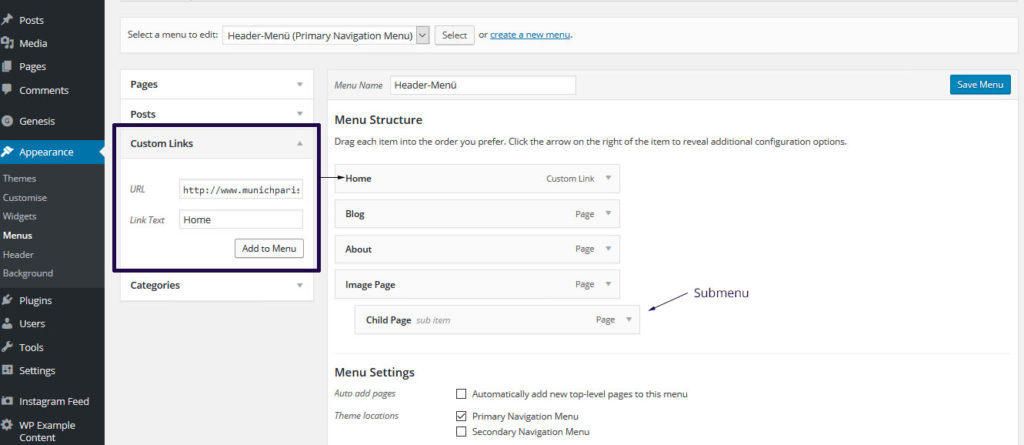
On the left side you can choose between adding Pages, Posts, Custom Links or Categories to the menu.
Pages/Posts: You can select from previously created pages/posts, e.g. About or Contact page.
Custom Links: You can insert custom links from other sites. You can use this option to add a link to your homepage. Enter your homepage’s URL into the box and give it a title, such as “Home”.
Categories: Here you can create category pages that will automatically display all posts from the desired category.
Sub Menu: You can create sub menu items by dragging the items below the other menu items. To create an empty parent element, select “Custom Links” and put a “#” into the URL box.
Set up the Social Media Icons:
The theme comes prepackaged with 10 of the most relevant social media icons.
Navigate to Appearance > Customise.
In the left menu select “Social Media Icons”.
Add your usernames in the boxes below the desired icons. If you leave a box blank, the particular icon will not appear.
Please note that you only have to insert the username and not the whole URL.
3. Add your own Header
You can choose between your blog’s title or adding a custom header image.
Blog Title as a header:
Navigate to Settings > General.
Set your blog’s title as Site Title. Additionally you can add a tagline.

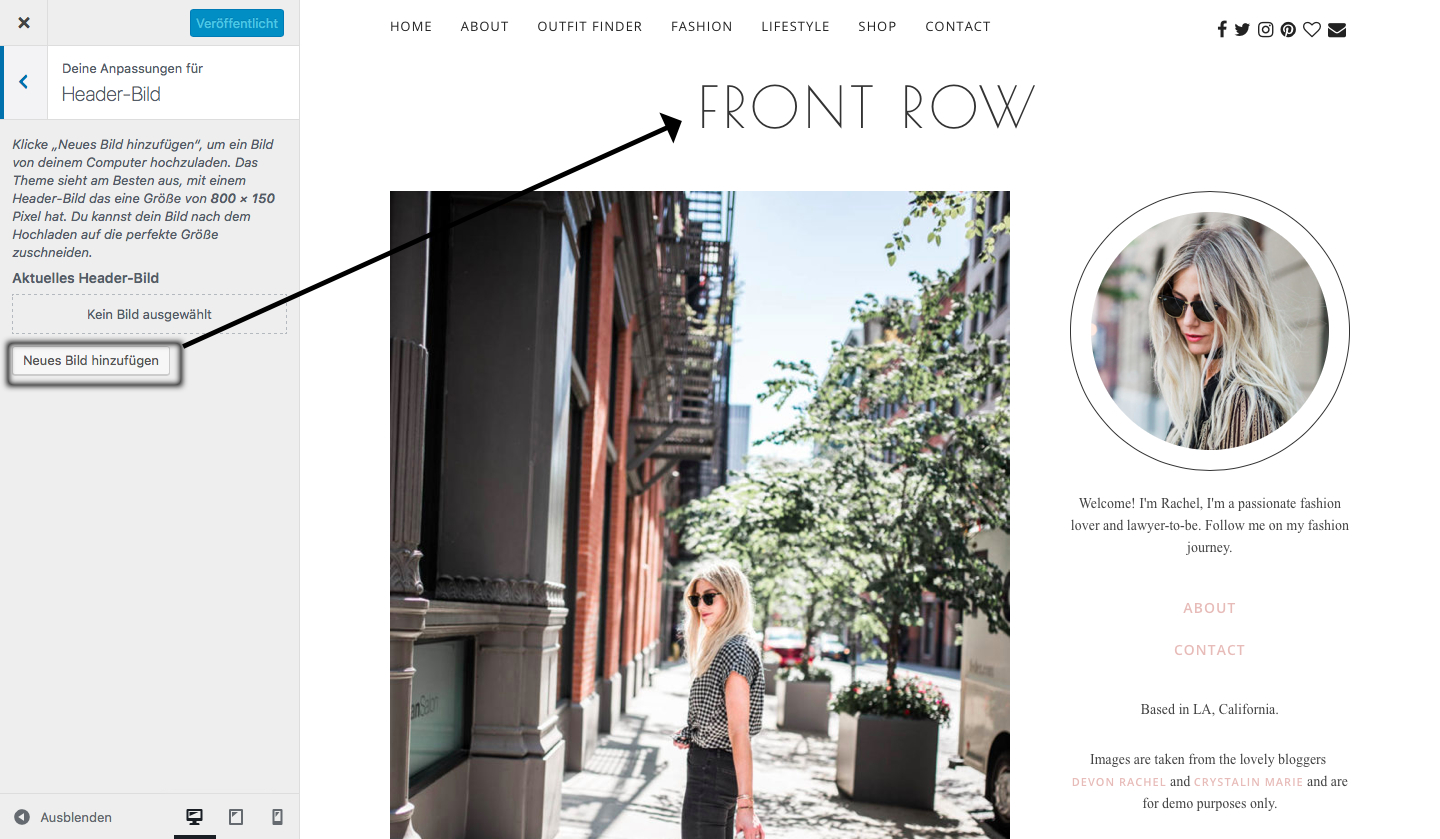
Custom image as header:
Navigate to Appearance > Customize.
Select Header Image on the left and click the “Add new” button to upload a new header image.
4. Theme settings
To make your posts display as an excerpt (and not the full post on the homepage), you have to customize the Theme settings.
Navigate to Genesis > Theme Settings. Scroll down to the ‘Content Archives’ area. And select the settings as follows:
Display: Entry excerpts
Tick ‘Include Featured Image’
Image Size: large
Image Alignment: Left

5. Shop the Post function
To add affiliate widgets with the products from the posts, follow these steps:
Navigate to the post you want to add the product widget to.
Make sure that Custom Fields are activated. In the top right corner of the screen, you can click on ‘Screen Options’ and tick the box ‘Custom Fields’ if it’s not done already.
Then scroll done to the custom fields boxes.

As name enter ‘shop‘ (if it’s not in the dropdown menu, click on Enter new), as a value paste the widget code you get from Rewardstyle or Shopstyle Collective.
Please note that you have to add the whole code here – the field doesn’t work with the shortcodes from Rewardstyle!
6. Categories and Subcategories
The theme has a great way to show subcategories on the category pages. It helps you to organize your posts even better and provide your readers for example with a cool structure for you outfit posts, in the ‘Outfit Finder’.
This is how you can add subcategories to your posts:
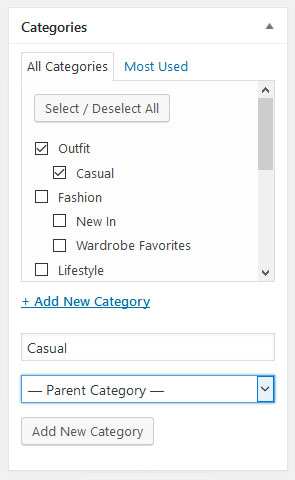
In the post editor, on the left you can add categories. To add a subcategory, simply choose a Parent Category.
In the example, Casual is a subcategory and Outfit is the parent category. The post will be shown on the Outfit page and on the Casual subcategory page.
7. Customize your sidebar
You can add every widget to your sidebar you like – to set up the sidebar like in the demo version, follow these steps:
Navigate to Appearance > Widgets. All widgets to appear in your sidebar are in the ‘Primary Sidebar’ container. To add a new widget, drag it from the left side in there, to delete a widget, expand it (with the arrow) and click ‘Delete’.
About Widget
Drag a text widget into the Primary Sidebar area.
Navigate to your Theme Package folder you received from us and open ‘about-widget.txt’. Follow the steps described there to fill out the text with your information.
To insert you profile image, go back to your WordPress dashboard and navigate to Media. There you can upload your desired image and copy the image URL.
When ready, copy the code and paste it into the text widget. Hit Save.

Search Widget
To add a search field to the sidebar, simply drag the WordPress search widget into the Primary Sidebar section.
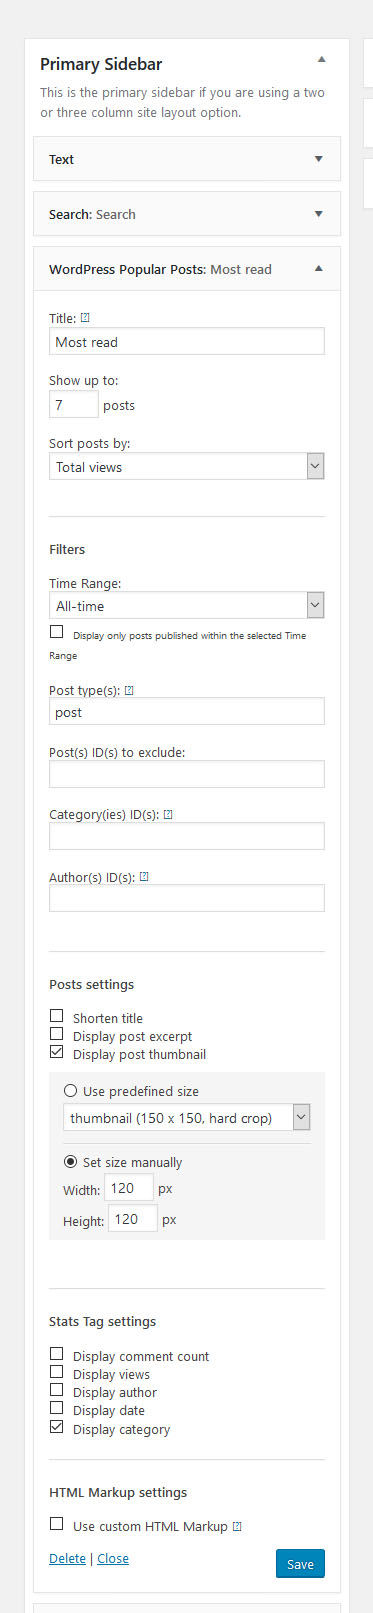
Most Read Widget
To display your blog’s most read posts, add the WordPress Popular Posts widget into the Primary Sidebar section.
The settings in the picture below are the ones to make it look exyctly like in the demo version. But feel free to try out other settings, if you’d like to.
Blog Archive Widget
To display an archive of your blog posts, you can add the Archives widget to the Primary Sidebar section.
8. Build you own blog shop
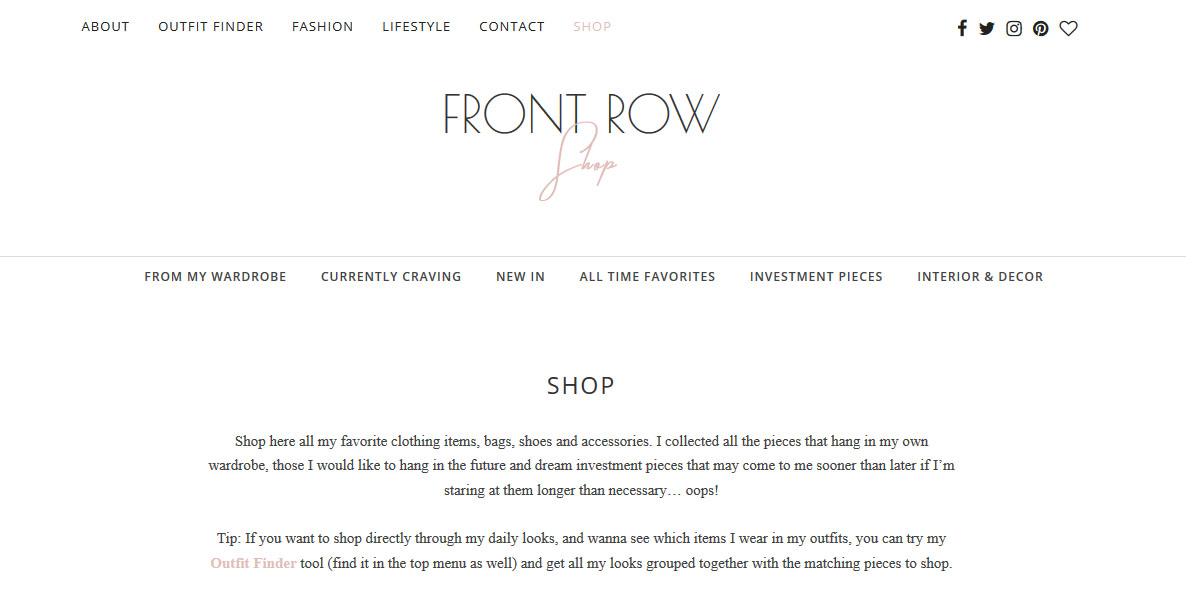
With this theme it is super easy to set up your own blog affiliate shop. It’s a great way to let your readers go through your favorite pieces and shop your wardrobe.
Navigate to Pages in your dashboard.
The shop is based on pages and sub-pages.
Add a page called ‘Shop‘ (or similar). This will be the main page of your shop system.
All other pages that should appear in the shop menu are sub-pages of the main page Shop.
Add another page, in the example called ‘Currently Craving’. Then you can simply paste the shop code from Shopstyle or Rewardstyle as the post content.

On the left side, in the Page Attributes select Shop (or how your main page is called) as Parent page and Shop Template as template.
9. The About page
This theme comes with a customized About page template.
Navigate to Pages and add a new page.
Be sure to select About Template as template in the Page Attributes on the left side.
Then paste the code from the about-page.txt from the Theme Package folder into the post editor (select ‘Text’ in the top right corner of the editor).
To add your own content and images, follow the steps in the file.
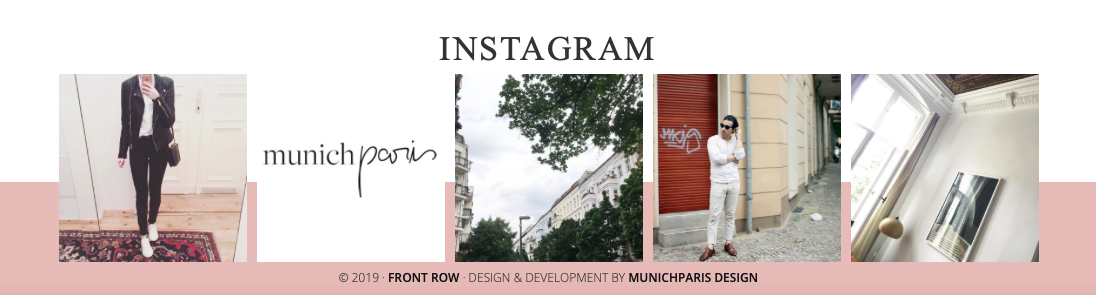
10. Add your Instagram feed to the footer
UPDATE SEPTEMBER 2019!! WP INSTANT FEEDS PLUGIN BY MNMLTHMS IS NO LONGER SUPPORTED AND THEREFORE STOPPED WORKING. PLEASE REPLACE PLUGIN WITH FOLLWING:
Go to Plugins and Add New – search for the ‘Social Photo Feed’ plugin by smash balloon and activate it. Navigate back to your WP dashboard and locate the plugin on the left hand side menu near bottom => INSTAGRAM FEED. Click on it to start setting up the plugin.
- We’ll start with the configure tab where we will connect the plugin with your Instagram account via the Instagram Access Token. This is needed & required by Instagram to authorise the display of your feed on your blog / website. To generate the access token please visit this site and follow the steps to create your access token (long string of numbers and alphabets). Click on the ‘manually connect your account’ button and paste the access token into the required field. Save your progress!
- Now we will style the Instagram gallery so it will look exactly like the demo version. For this please click on the customise tab of your plugin (next to configure tab). At the general section the width of the widget is automatically set 100% and you don’t need to do anything further. Leave height blank. Next set the number of images you like to display in your Instagram gallery. Depending on your theme please set a number and also define the number per columns. For example when the number of images is 12 set the number of columns 6 – this is create 2 rows. Also important please leave the ‘padding around images’ blank or zero value. Please tick the box ‘disable mobile layout’ in order to make the Instagram widget responsive and mobile friendly! Another important thing is to uncheck all the unnecessary check boxes like header, load more and follow buttons. We want the widget to look slick and minimal. Don’t forget to save your changes.
- After we’ve prepared the plugin and set it up correctly we can now integrate the Instagram Feed onto your blog / website. Please navigate to APPEARANCE => WIDGETS and drag a Custom HTML widget to the designated widget area you like to display it. Type in your title and copy paste flowing code into the value field: [instagram-feed]. Don’t forget to save the changes. Voila your Insta Feed is back online!
EXTRA SOURCE: Since this is a very recent change and not all MPS Themes have been updated yet, please add this little extra code snippet to your ADDITIONAL CSS panel. This is will solve the issue with the ugly gap between widget bottom and footer area. Navigate to APPEARANCE => CUSTOMISE => ADDITIONAL CSS and copy paste following code:
And that’s it!
Your theme is now customized and ready for you to use! I recommend reading the Beginner’s Guide to Genesis to dive in a bit deeper into what you can do with your new framework powered WordPress theme.
If you have any questions about the installation or usage of your theme, please don’t hesitate to contact us.