
Did you know that a secure blog with a connection over HTTPS is considered a ranking factor for Google? This means that if you want to rank high in terms of search engine optimization, you have to secure your blog’s connection. Now, Google has announced the newest version of their Chrome browser and with it the message that all HTTP sites that still don’t use a secure connection will be marked as not secure from July 2018 on. You can read all about the news on the Chromium blog.
What does the update mean for you as a WordPress blogger?
This update is a serious shift in making the web more secure and a very important thing for you and your WordPress blog. Today over 60% of desktop users use Chrome as their browser and those 60% of your blog visitors will then see a not “Not Secure” badge next your blog URL. This will most likely not only hurt your SEO rankings, but could also cause a drop in visitors and revenue.
This means you have to get a SSL certificate and move your WordPress blog to a secure connection now. Don’t worry! We have put together this really easy to understand tutorial and also offer a HTTPS migration service if you don’t want to do it on your own.
What is a SSL certificate and where do I get one?
The good news is: A SSL certificate won’t cost you money, at least if you can use the free Let’s Encrypt certificate. It is verified by a so called certificate authority (CA) and it will tell your visitors that they can trust your blog and its connection. Having a SSL certificate installed on your WordPress blog will secure all connections from your blog and all data that is sent, for example from contact or comment forms.
You should now check with your hoster if they allow you to install Let’s Encrypt certificates. If this is not the case, ask for their support or consider switching the hosting company. Securing websites should be an important concern for any hoster and shouldn’t cost you a lot of money.
This tutorial shows you how to get your certificate using the example of our partner host, Bluehost. In all of their plans, a free SSL certificate is included. It should work very similar with other hosts, many of them offer an easy one click installation.
How to move your WordPress blog to a secure https connection (without a plugin)
This version is recommened if you don’t want to use another plugin to maybe slow down your site.
1. Get a SSL certificate as described above
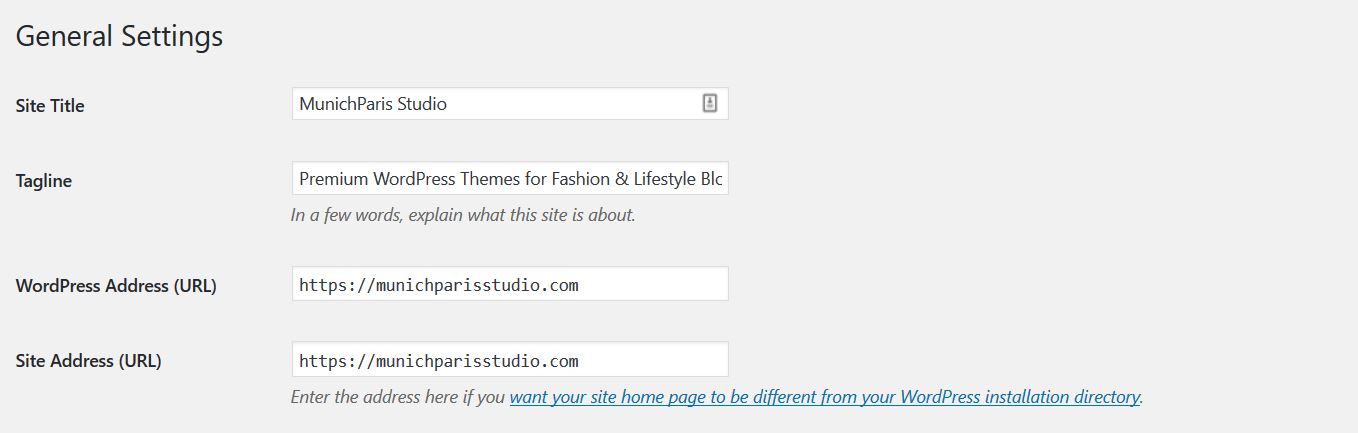
2. Change your site URL to HTTPS
In your WordPress dashboard, navigate to Settings > General and change the URLs in the two fields WordPress Address (URL) and Site Address (URL) from http://yourdomain.com to https://yourdomain.com.
3. Force redirection to HTTPS in your site’s .htaccess file
This step requires an FTP connection to your webspace. If you aren’t sure how to establish one and edit files on your server, you should consider using the plugin tutorial version down below or let us do it for you.
If you have connected to your webspace with a FTP client, download the .htaccess file from your server and add these lines to the top of the file (right before #BEGIN WORDPRESS). Then uplaod it again.
RewriteEngine On
RewriteCond %{HTTPS} !=on
RewriteRule ^ https://%{HTTP_HOST}%{REQUEST_URI} [L,R=301]
4. Replace all HTTP with HTTPS URLs
Now you have to make sure that all URLs on your blog (e.g. internal links or image addresses) point to the secure version of your domain. To replace all HTTP links of your blog’s domain in your database, use the plugin Better Search Replace. Simply download it from the plugin repository and activate it.
Then navigate to Tools > Better Search Replace. Put http://yourdomain in the Search for field and https://yourdomain.com in the Replace with field. Make sure to select ALL database tables and do a dry run to test if everything is okay.

IMPORTANT: Always make a backup of your site before changing anything in your database!
After you have made a complete database backup, you can uncheck the dry run box and have all unsecure blog links replaced from your site.
5. Check manually for mixed content and HTTPS erros
Technically you are all set now. If everything went smooth you should see a green padlock next to your blog’s URL in the browser tab. If this is not the case and the padlock is orange or it says that there is some unsecure content left on your site, you can use the following service to check for mixed contents:
It will show you all images links, third party connections or other links that are not coming from a secure HTTPS connection and you can correct them manually.
If you don’t want to mess around with server files and database changes, you can also use a plugin to move your WordPress blog over to a secure HTTPS connection (see tutorial version below).
Use a plugin to move your WordPress blog to HTTPS
This version is recommend if you want a quick fix and aren’t that tech-savvy.
1. Get a SSL certificate as described above
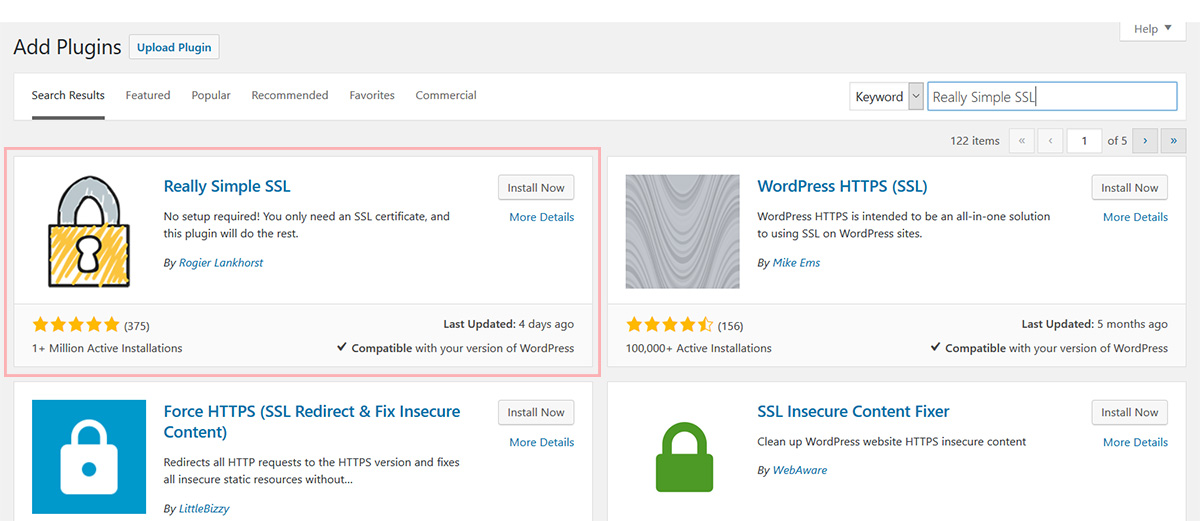
2. Install the Really Simple SSL plugin
Navigate to Plugins > Add New and search for Really Simple SSL. Click Install Now and then Active.
Now you only have to click the Go ahead and activate SSL button that should show up in your dashboard and you are good to go! Please note that you need to keep this plugin activated to sustain HTTPS for your website.
If you don’t want to have a third-party plugin manage this for you, you can use the other version of this tutorial and handle the switch on your own.
Need help with the move to HTTPS?
We can help you move your blog over to HTTPS in no time! Click here to write us an email and book our Secure HTTPS blog service and we will take care of the migration from HTTP to HTTPS within one business day.
